

Should I Learn To Draw On Paper Or Tablet
Many people want to know whether digital cartoon or traditional drawing is ameliorate.
When getting started with digital art, you may feel that you could draw much better on pen and newspaper.
This article covers tips to aid yous adjust to your new drawing tablet!
Endeavour them out to improve your drawing feel!
This article introduces the all-time tablets for beginners to digital fine art!
Method 1 for dealing with uncomfortable cartoon tablets:
Match your manus movements with the movements on the screen
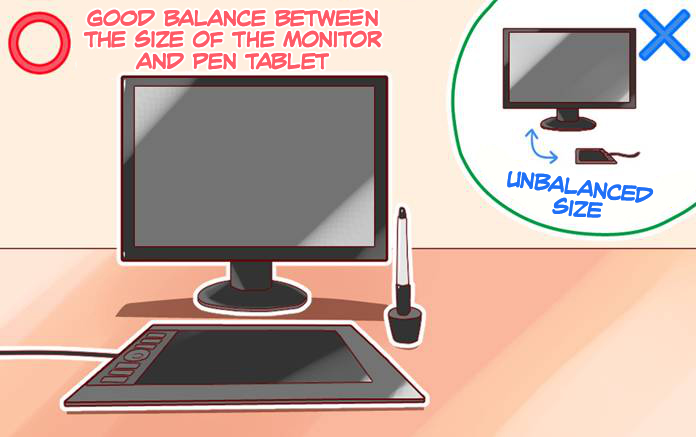
The start thing that you may want to gear up is the ratio of the size of your drawing tablet to the size of your screen.
For case, if you lot use a modest drawing tablet for a large monitor, moving the pen simply a little bit volition move the mouse significantly.
Conversely, if you apply a large drawing tablet for a small monitor, you will need to move the pen a cracking distance to move the cursor on the screen.
I big reason for discomfort is this mismatch between the distance moved by the manus and the distance moved on the screen.
To set this, you need to conform your cartoon environment.
For artists that depict from the wrist
The average pen stroke distance when cartoon using the wrist is effectually ten centimeters.
Equally a result, the cartoon tablet also doesn't need to exist too large. We identify this small tablet in forepart of the monitor.
By pushing the monitor slightly dorsum, the screen will wait smaller, lessening the discomfort from the mismatch of paw and cursor.
For artists that describe from the elbow
Big strokes require y'all to use your entire arm to draw. Such lines could become 30cm in size, but ownership a huge commercial-grade tablet isn't realistic. Instead, merely find a big drawing tablet.
Pen strokes on a large tablet should match well with the cursor motion on a 15-inch monitor.
If your monitor is larger than 15 inches, endeavour pushing information technology back a little to make it look smaller.
Wacom Intuos Series
Wacom Intuos Pro Series
Method 2 for dealing with uncomfortable drawing tablets:
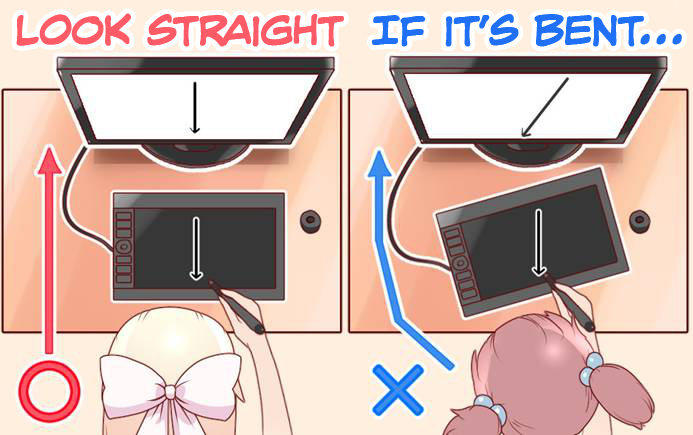
Sit directly in front of the monitor and tablet
If you still feel discomfort after fixing the mismatch between your hands and cursor, the bending of the monitor and tablet may be the trouble.
If you place the tablet at a slanted angle from the monitor, you volition experience an "bending mismatch" between the motion of your hands and that of the cursor.
For case, permit'southward say you desire to draw one vertical line. If the drawing tablet is placed at a different bending from the monitor, a diagonal line will announced on the screen fifty-fifty though you drew a vertical line on the tablet. This is called an angle mismatch.
To fix this upshot, keep these two things in heed when drawing.
・Place your cartoon tablet directly in forepart of the monitor
・Confront the monitor directly
By matching the direction of the monitor, drawing tablet, and yourself, y'all can gear up this angle mismatch.
This, will allow yous depict the line that you lot desire.
Angles are important!
As you lot get better, you will be able to right these mismatches as you go. Even so, this might non exist the instance if you lose concentration from long hours of piece of work. To decrease your burden, it's recommended to identify your tablet directly facing the monitor whenever possible.
Method three for dealing with uncomfortable drawing tablets:
Check the friction between the drawing tablet and pen
One common concern is that the drawing tablet is "glace" compared to pen and paper.
Since drawing tablets are made of slippery materials, at that place is less friction between them. If slipperiness is the primary concern, then all we have to exercise is stop the slipping, right?
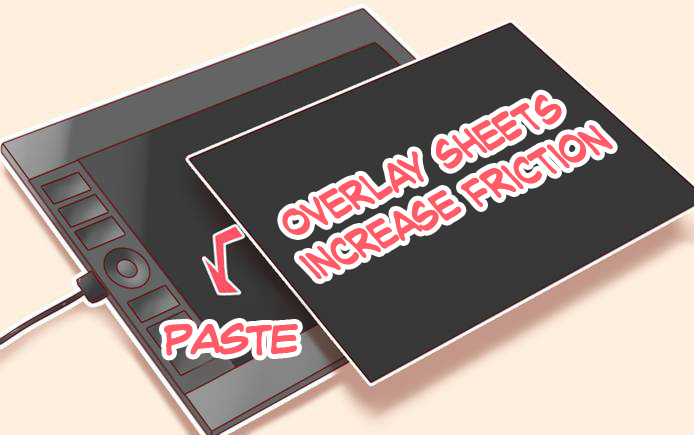
First of all, there are protective overlay sheets to increase friction. Buying one of these and using it will make it less slippery.
If you lot yet experience that the pen is slippery, you can too replace the nib of the pen.
Some nibs can increase friction.
For case, Wacom Intuos Pro's"Felt pen nibs"have a rougher feel.
Using these nibs creates a paper-like drawing experience.
Past customizing your tablet and pens with other products can produce friction and make you lot experience as if yous were drawing on newspaper.
Notation: The availability of protective sheets and nibs varies by manufacturer and model number of the tablet or pen. Always check your device'due south model number earlier purchase.
You could simply get used to the glace tablet!
Although this article introduces ways to simulate a paper-like feel, having more than friction causes more stress on the easily. The longer you draw, the more tired you will become. You might as well go cramp or swelling in the hands. If you have to draw long hours, y'all don't want to spend also much free energy drawing. Thus, information technology might help in the long run to become used to the smooth pen tablet.
Many people who have switched from traditional to digital drawing say that their hands have become less tired. Since there is less friction, it takes less effort to movement the pen. That means inking also becomes much more than efficient. Information technology might be easier to have similar friction as pen and newspaper at starting time, but it would be better in the long run if yous get used to low friction environments.
Check the thickness of the pen
Nosotros've introduced a lot of methods, but if none of them work for you, attempt checking the thickness of your pen.
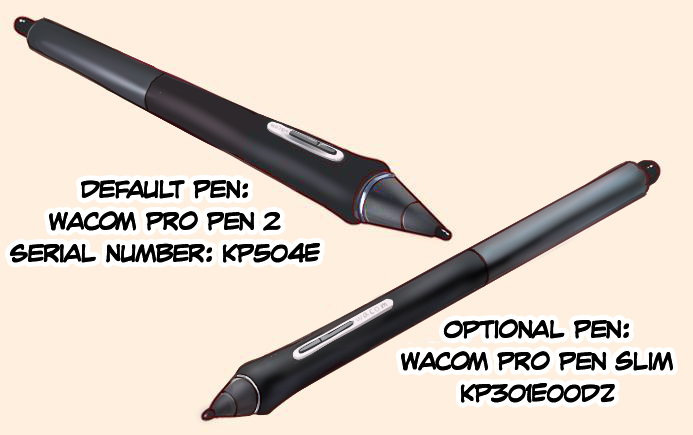
For example, pens that come with the Wacom Intuos Pro are designed to exist slightly thicker. This thickness might be just perfect for men, but it may be besides thick for women.
Wacom Intuos Pro has a slightly thinner model called Wacom Pro Pen slim, so maybe y'all should try that out.
Method four for dealing with uncomfortable drawing tablets:
Settings – Adjusting pen pressure
There are three things to keep in heed when designing your cartoon tablet to fit you: i. The angle of the stroke, two. the friction of the pen, and 3. the pen pressure. If you've read this article from the get-go, you've probably already done steps i and two, and then we're going to look at the final "pen pressure" adjustment to set up the discomfort.
In that location are ii methods for setting up pen pressure level, simply many people but have 1 of the ii prepare.
・Via the cartoon tablet'due south driver
・Via the cartoon software
Commuter adjustments let your drawing software easily procedure information from your cartoon tablet. On the other paw, adjustments from the illustration software fine-melody the touch and feel for each tool.
Thus, it's recommended toadjust overall pen pressure from the tablet driver, thenadjust pen pressure for each tool from the drawing software.
1. Adjusting pen force per unit area from the tablet commuter.
Start, open the drawing tablet's commuter. For Wacom tablets, search for "Wacom" to find "Wacom Tablet Property (Driver)" and click to open.
You might feel that the pen is so hard that you demand to put a lot of pressure to start cartoon. On the other hand, you lot might feel that the pen is so soft that only touching information technology with the tablet will make information technology start cartoon. These concerns can be solved on the tablet driver's "Tip feel" slider.
Note: Driver settings will vary by type of drawing tablet and their versions.

If you're feeling uncomfortable because your pen is too firm, motion the "Tip feel" slider to the left to soften your pen.If you lot're feeling uncomfortable because your pen is too soft, motility the "Tip feel" slider to the correct to harden your pen.
There is a "Customize" button under "Tip experience." Clicking this will allow yous to adjust advanced settings. Withal, since yous will be changing these settings on the illustration software too, yous tin leave this lone.
two. Adjusting pen pressure settings via the cartoon software.
Once you're done with adjusting pen pressure in your driver, it's time to adjust pen pressure via the drawing software. We are going to utilize Clip Studio Pigment as an example.
・Adjusting pen pressure levels for the entire software
Later on launching Clip Studio Paint, create a new canvas (the settings here aren't important), then select the File menu > Conform pen pressure level settings to adjust the pen pressure level of the entire software. Note. If you've already fix 1., then you practice not demand to accommodate this setting.
・Adjusting Pen pressure settings for each tool
With some drawing software such as Photoshop and Clip Studio Paint, you can prepare individual pen pressure curves for each tool.
In this instance, we are going to use Clip Studio Pigment to adjust pen force per unit area unique to the tool.
From Clip Studio Paint'southward Sub Tool, detect your virtually frequently used pen to view its tool property.
By clicking on the modest button at the right cease of the brush size option, a dialog chosen "Brush Size Dynamics" volition appear. This will allow yous to set pen pressure.
If pen force per unit area isn't checked, bank check the box, so adjust the pen pressure graph below.
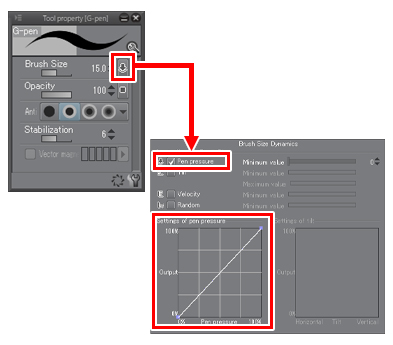
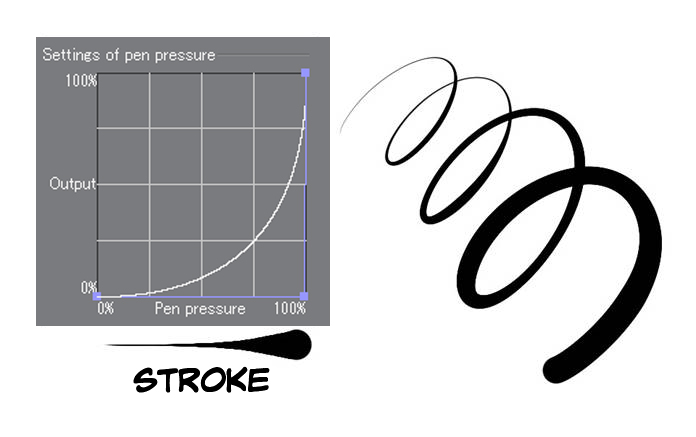
The horizontal axis is the pen pressure, and the vertical centrality is the thickness of the castor.
The graph is a directly diagonal line by default, so let's adjust this to make it easier to draw. Hither are two examples, so please use them as references!
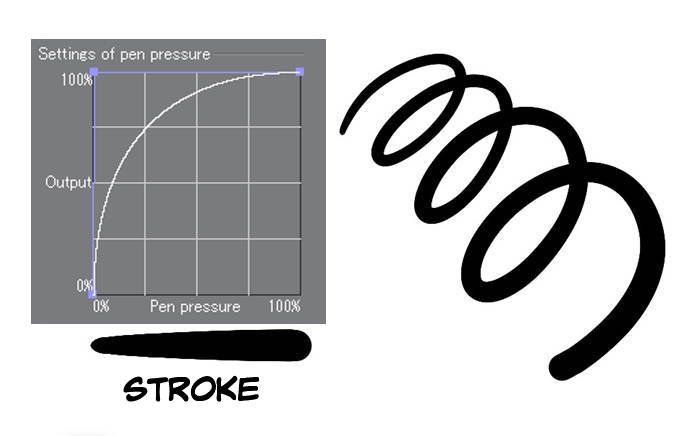
Pen pressure settings for a softer feel
The pen will get-go to draw from the moment you place the pen on the tablet. The brush size will increase significantly, fifty-fifty if you but put a piffling pressure. The castor size will attain almost maximum after 50% pen pressure, and information technology volition barely increase after that.
Pen force per unit area settings for a house feel
The brush size will stay modest while cartoon, and will only increase after yous put a good amount of pen force per unit area. By applying near-maximum pen pressure, the brush size will increment dramatically.
Larn to utilize your drawing tablet's useful features
There is more to drawing tablets than just drawing.
At that place are side switches on the side of the pen, function keys on the tablet itself, and on-screen controls that you can utilize by selecting specific buttons and function keys.
These buttons and function keys are usually used to set up shortcut keys.
Shortcut keys usually aid reduce frustration and time, just they might feel a little advanced. Don't worry, you volition get used to it every bit y'all use them!
one. Use the pen'southward side switches
Open Wacom's tablet backdrop. Click Input device > Pen to register shortcut keys to the 2 buttons on the side of the pen.

What should I annals on the side switches?
Register your most frequently used shortcuts and functions to your side switches. Many people annals commands like Undo, Redo, Eyedropper, Castor Size, and Eraser on their buttons. The eraser tool is also on the other end of the pen, but information technology's a lot easier to printing a button than to flip the pen.
2. Use function keys!
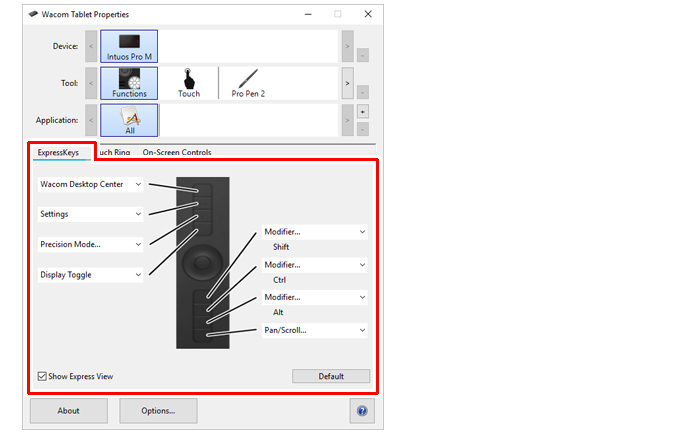
From the Wacom tablet properties, choose Input device > Part, and so click on the Function key tab to set part keys.
It would assistance to register your frequently used tools and modifier keys to use the sail.
Since you'll be using your other hand when using role keys, y'all tin can work efficiently past using both easily at the same time.
iii. Apply On-Screen Controls
In improver to hardware buttons, the Wacom pen tablet is too equipped with a digital function called "On-Screen Command" that allows you to use digital buttons temporarily displayed on the screen.
The On-Screen Control has many buttons, so you can register fifty-fifty more than tools and operations. At that place are diverse customizable menus such as Radial Menus and Pull-down Menus in this feature. In this article, nosotros will look at a simple Radial Carte.
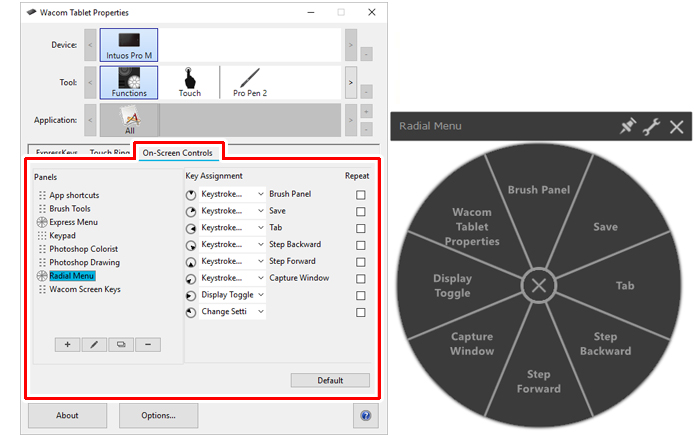
You can register upwards to eight tools and operations at a time, and use further hierarchizing to register up to 8 × 8 = 64 tools and operations. By registering the operation to recollect the Radial Carte to the pen's side switch or the tablet's office keys, you tin can efficiently employ a lot of tools and operations with the pen tablet solitary.
Modifier Key Settings Help!
In improver to shortcut settings, Clip Studio Pigment has a Modifier Key Settings features. Modifier keys such as Shift, Ctrl, Alt, and the space bar can be used to change the tool (i.e., Holding down the Alt key to temporarily show the Eyedropper tool), but you can alter this to something unlike (i.e., alter the Alt fundamental from Eyedropper to eraser).
Furthermore, yous can set tools for multiple modifier keys (i.eastward., holding downwards Shift + Ctrl + Alt temporarily changes the tool to a bucket). This volition permit you register even more features. If you're using Clip Studio Paint, we advise you to customize these settings to fit your needs and use tablet side switches and function keys to your will.
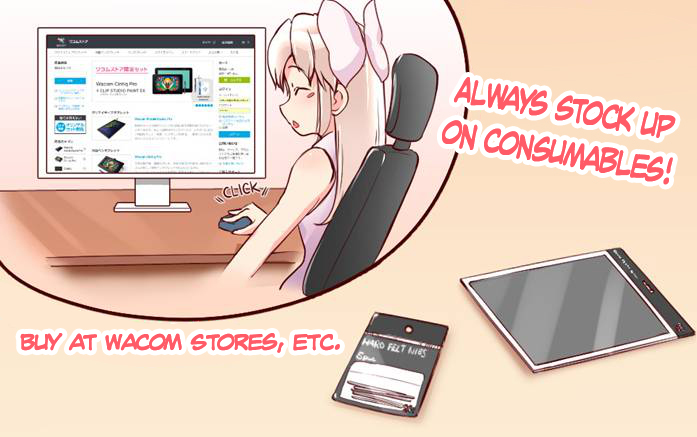
Always keep spares of consumable tablet parts
Parts such as protective sheets and pen tips are consumables. They usually deteriorate over time. If protective sheets deteriorate, they lose friction. If the tip wears out, it volition bear upon pen pressure and comfort.
These consumables may take fourth dimension to restock depending on the region. It is more often than not advised to keep spares before they wear out.
・Where can I buy replacements?
Replacement parts for Wacom drawing tablets can be bought online at the Wacom Shop or Amazon, or from retail stores that sell Wacom products.
Summary
By adjusting the settings, your drawing tablet tin become your best partner in art. There's a huge difference in cartoon with a tablet that has all your favorite settings and drawing with a tablet that doesn't.
If you lot thought pen and paper was the simply way to go, perchance try again with new and revised settings!

Source: https://www.clipstudio.net/how-to-draw/archives/155358
Posted by: hernandezmucall.blogspot.com
0 Response to "Should I Learn To Draw On Paper Or Tablet"
Post a Comment