

How To Create A Dc Motor
Need to build a DC Motor for your HSC Physics Practical? Worried that your motor will be all powered up with nowhere to spin? Well, don't worry! In this post, Physics guru Tom Dixon will show you how to build a DC motor.
To help you get your motor running, we've written up a step-by-step guide so you can make sure your experiment is all torque and not just all talk!
HSC Physics Video: How to Build a DC Motor
In this video, I explain how to build your DC Motor. For this practical assessment, you'll first need to get the following items:
- Some aluminium foil
- A coil of copper wire – to be safe you want at least a metre
- 2 rigid copper wires – these need to be long enough to reach the commutator and also touch the base
- 4 screws – These are used to fit your angle brackets
- 2 Washers
- 2 Electrically conductive screws – These need to be electrically conductive so you can wrap your wires around them when you connect the motor
- 2 washers
- Some fasteners – To hold your rigid wires in place
- A power pack
- A sturdy piece of wood – This needs to be at least double the length and width of your motor. Your motor needs to comfortably fit atop this.
- A piece of styrofoam – Your styrofoam should be wide, but not long; you want to have a short/thick styrofoam and coil system. For the video, I cut pieces from a styrofoam ball until it was the appropriate shape and size
- A set of strong magnets
- A piece of sandpaper
- 4 angle brackets ( 2 regular and 2 slotted) – The slotted brackets must be able to fit your rotor into them (i,e the slot size should fit a sharpened pencil, but it shouldn't be able to go all the way through). They also need to be high enough that your styrofoam doesn't hit the base when the unit spins. The regular angle brackets must be as high as the slotted brackets so the magnets stuck to them are as high as the rotor coil.
- 1 pencil, sharpened on both sides
- 1 screwdriver (make sure you have a phillips head screwdriver if your use screws with a X-head)
- A multimeter
- Scissors
- Sticky tape
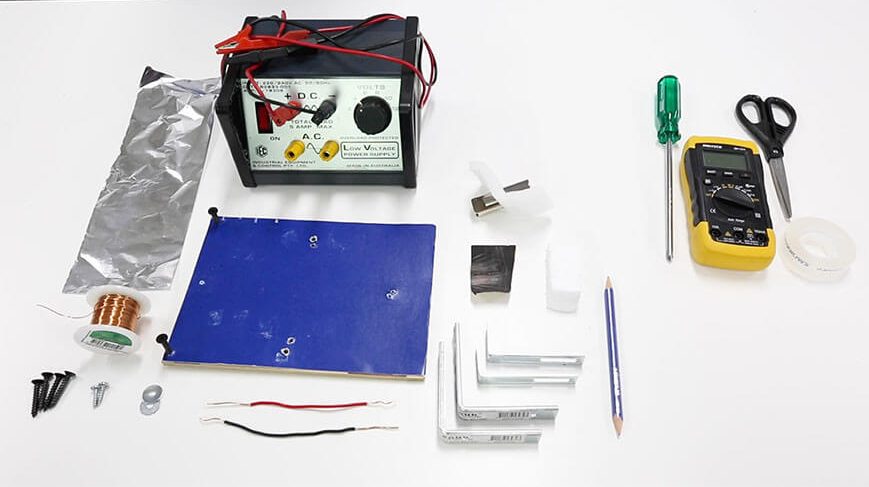
The parts and equipment you will need.
Once you've got this together, your ready to build your motor.
Let me show you how:
Video: How to Build a DC Motor
How to Build a DC Motor from Matrix Education on Vimeo.
Want to gain more confidence in HSC Physics?
Get ahead of your peers with Year 12 Physics Term Courses. With advanced completion of contents before it's taught at school, you'll be better prepared for your school assessments. Learn more about Year 12 Physics.

How to build a DC motor step-by-step
In case you want to follow a step-by-step guide, we've included the steps for building the motor below.
Step 1: Build your coil base.
First, you need to build your coil base.
To do this, insert your pencil through the styrofoam. You want to make sure that the foam sits about a quarter of the way along the pencil.

Only put the pencil about a quarter way through the Styrofoam.
You're now ready to dress it with the copper coil.
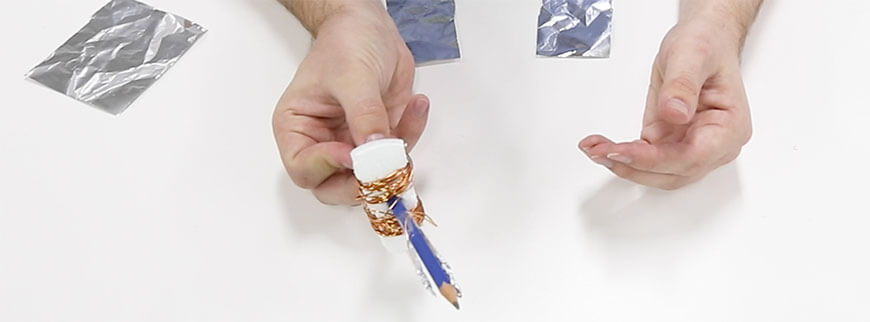
Step 2: Wrap the coil around the coil base
First, you want to strip the end of the wire so it conducts electricity effectively. To do this sand down the ends using the sandpaper.
Then, wrap the copper wire around the base. When wrapping the styrofoam, I prefer to wrap one side and then the other. You want to make sure that both sides are evenly wrapped.
Remember, the more turns of the wire, the more torque your motor will generate!

Step 3: Test the electrical connection of the wire
Now you've wrapped the base, test the wires with your multimeter set to 'beep' mode (this is also called 'continuity' mode).
To do a "beep-test,' touch each lead of the multimeter (making sure it's in 'beep' mode) to a different end of the coil – do you hear a beep?
If you don't hear a beep, your connections aren't working. You need to sand the ends down further. Use the sandpaper to really rough up the ends of the wires.
Test the wires after further sanding. If they still don't conduct, wear them back until they do.
Step 4: Improve the electrical connections of the coil base
Cut two strips of aluminium foil about 1.5 cm wide and long enough to wrap around the wire tips several times.
Wrap the ends with the foil. Make sure you wrap the foil tightly around the end. You can use sticky tape to secure it, but you must ensure that you only use a thin piece and don't interfere with the electrical connection.

Be careful with your sticky tape placement
Step 5: Check the connections
Now we've built the base, we need to double check the connections to make sure they conduct.
Grab your multimeter and conduct another beep test to ensure the wire is conducting.
Do you hear a beep? Yes. Then you're ready to build your commutator.
Step 6: Make the commutator
For this, you'll need two pieces of aluminium foil to wrap the styrofoam and copper coil. You'll need to make two half-circles of foil that run along the length of your axle. Stick these down on top of the wire-ends. You'll then sticky tape this to the side of the pencil.
You must align the commutator and coil correctly.
Remember: When the coil is horizontal in the maximum torque position your commutator should be in electircal contact.
You want the two electrical contacts to be at contact when the torque is at maximum.
Similarly, when the coil (and this is the coil, not the styrofoam) is vertical you want the gaps in the commutator horizontal.
Make sure you set the coil correctly. When the coil is horizontal, you want the commutator to be horizontal.
Follow this process to build the commutator:
- Strap the wires to the pencil with tape close to the coil. Make sure you place each wireunderneath where the commutator section will go. The wires should be stuck down so that they are on the two opposite horizontal sides of the axle when the coil is horizontal.
- Fold the first foil strip the correct width and wrap it around one side of the pencil
- Tape it to the top and bottom of the pencil to hold it in place
- Fold the other piece of foil and wrap it around the other side of the pencil.
- Tape that in place, too
You should now have a pencil that is wrapped with two strips of foil and a thin gap between them running from tip to styrofoam. See the screenshot below if you're unsure.

The gap is what enables the motor to generate continuous torque in the same direction.
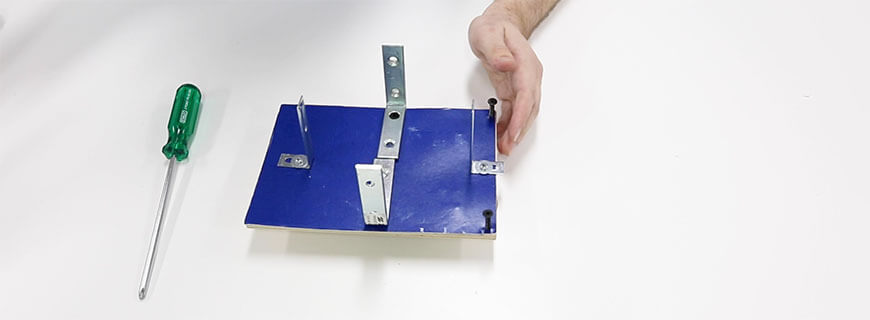
Step 7: Construct the stator (the base)
The stator is the base if the motor. Stator is a word derived from "stationary" and "rotor" on the pattern of "rotor."
Your stator needs to hold your rotor in place while it spins.
You'll need to use your angled brackets with slots for the axial direction of the motor (ie, the long side and not the wide side of the wood).
- Measure the pencil and mark the wood at the appropriate distance.
- Then, screw in the slotted angle bracket with screws and washer. Leave them a little loose so you can secure your pencil rotor.
- Next, screw in the regular angle brackets on the edges of the board in the middle.
- Insert the pencil into the slotted brackets
- Adjust the bracket positioning so the pencil is secured but can rotate
- Tighten the slotted bracket so it is securely in place
Now you've built the stator, you're ready to attach the wires for the current.
Step 8: Attach the wires for the power supply
Now you've got the rotor and stator for your DC motor, you need to get it powered up. Like Iron Man without his arc reactor, your motor won't do much unless it is powered up.
- First, you need need to affix the two electrically conductive screws at the commutator end of your stator
- Next, you need to trim the ends of your stiff wire and ensure they are clean
- Wrap one end of the each of the trimmed wires around each screw
- Bend the wire so it makes the brush contact with the commutator
- Affix the wire with a clip or tape to ensure it doesn't move when the rotor spins. You don't want the torque from the rotation to shake the contact loose.
Now your motor is wired, it's ready for its final tests.
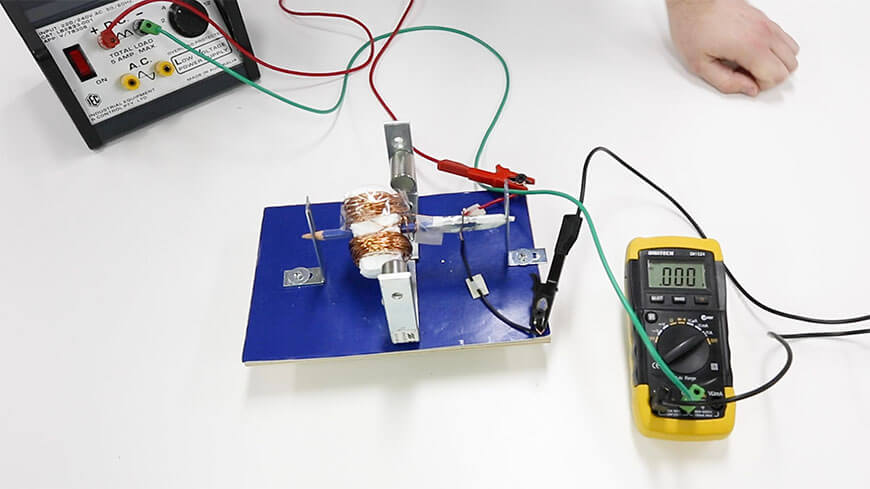
Step 9: Beep-test the connections
Take the multimeter and beep test the connections to make sure they function.
Double check the commutator and the connection from the screws to the stiff electrical wire.
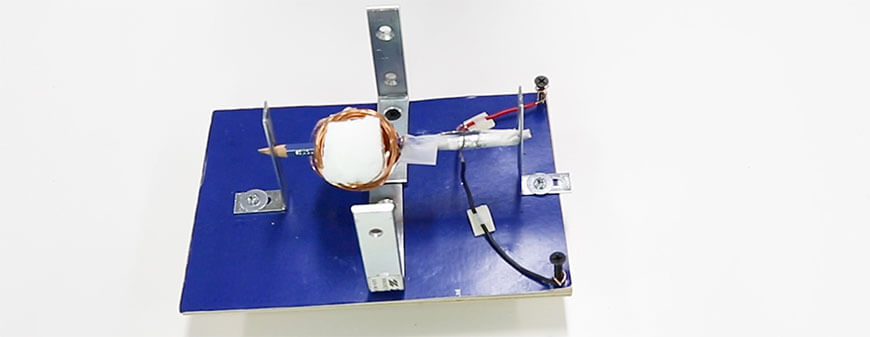
Step 10: Get your motor running
Now you've built the rotator and stator and put them together, you're ready to get things rolling.
First, affix the magnets to the regular angled brackets.
Make sure that you have enough room between the magnets for your rotor to spin!
Next, connect your power supply's alligator clips to the conductive screws.
Turn the power on. Don't be disappointed if it doesn't kick off on its own; the coil is heavy.
If your motor doesn't spin on its own – it may just rock a little – you need to give it a little nudge to get it ticking over.
Congratulations, you've just built your first DC motor!
Don't let these common errors ruin your results!
Now you've built a motor, you need to know how to troubleshoot it so you can guarantee that it will work on the day. In our next post, we'll show you the Top 5 Student Mistakes when Building a DC Motor and how to fix them!
Want to ace your next Physics Practical Assessment?
Download the Matrix Practical Skills Workbook and sharpen your Physics skills. Learn how to:
- Assess the validity, reliability and accuracy of any measurements and calculations
- Determine the sources of systematic and random errors
- Identify and apply appropriate mathematical formulae and concepts
- Draw appropriate graphs to convey relationships

How To Create A Dc Motor
Source: https://www.matrix.edu.au/hsc-physics-how-to-build-a-dc-motor-video-and-step-by-step-guide/
Posted by: hernandezmucall.blogspot.com
0 Response to "How To Create A Dc Motor"
Post a Comment